The most important photo booth lighting tips come down to one core principle: soft, even light placed at the right angle eliminates harsh shadows, flatters every face that steps in front of the camera, and makes the difference between photos guests want to delete and photos they immediately set as their profile picture. Get the lighting right and almost everything else about the photo takes care of itself.
Most event planners spend significant time selecting the perfect backdrop, curating a thoughtful prop collection, and choosing a booth setup that matches the occasion. Lighting frequently gets treated as an afterthought, something to figure out once everything else is in place. That approach almost always shows in the final photos. Flat faces, dark under-eye shadows, blown-out backgrounds, and washed-out skin tones are all symptoms of lighting decisions made too quickly or too late in the planning process.
Why Lighting Is the Single Most Important Variable in Photo Booth Quality
A beautiful backdrop behind poorly lit guests still produces a bad photo. The reverse is also true: a simple backdrop behind guests who are lit well produces a photo that looks clean, professional, and genuinely flattering. Lighting shapes everything the camera sees, from skin tone to depth to the way color renders across the entire frame.
The human eye adapts to poor lighting conditions naturally. A camera does not. What looks perfectly visible and pleasant to a person standing in a dimly lit ballroom looks dark, grainy, and flat when a camera tries to capture it without the right light source in place. This gap between what guests experience in the room and what the camera actually records is exactly why photo booth lighting deserves serious attention before the first guest steps up to pose.
For event planners managing activations where guest experience and shareable content are both priorities, this matters financially as well. Photos that look genuinely good get shared. Photos that look mediocre get politely saved and never opened again. The reach and social visibility of your event's photo booth experience is directly tied to whether the lighting made people look their best.
|
Lighting Setup Quality |
Effect on Photos |
Guest Behavior |
|
Soft, even front lighting |
Flatters all face shapes and skin tones |
Guests share photos and return for more |
|
Single harsh overhead light |
Creates unflattering shadows under eyes and chin |
Guests delete photos or don't share |
|
Backlit setup with no fill light |
Silhouettes guests against the backdrop |
Photos are unusable without heavy editing |
|
Mixed color temperature sources |
Skin tones look unnatural and inconsistent |
Photos feel off without guests knowing why |
|
Properly diffused key and fill lights |
Even exposure across entire frame |
High satisfaction, strong organic content |
Understanding the Basics of Photo Booth Lighting
Before getting into specific setups and equipment choices, it helps to understand what different light sources actually do and why certain configurations consistently produce better results than others. Good photo booth lighting tips are rooted in a handful of principles that professional photographers have applied for decades.
The Role of Diffusion
Raw light from a bare bulb or undiffused flash creates hard shadows that age faces and flatten features. Diffused light, meaning light passed through a softbox, umbrella, or translucent panel, spreads and softens before it reaches the subject. The result is a gradual, flattering transition between lit areas and shadows that looks natural rather than harsh.
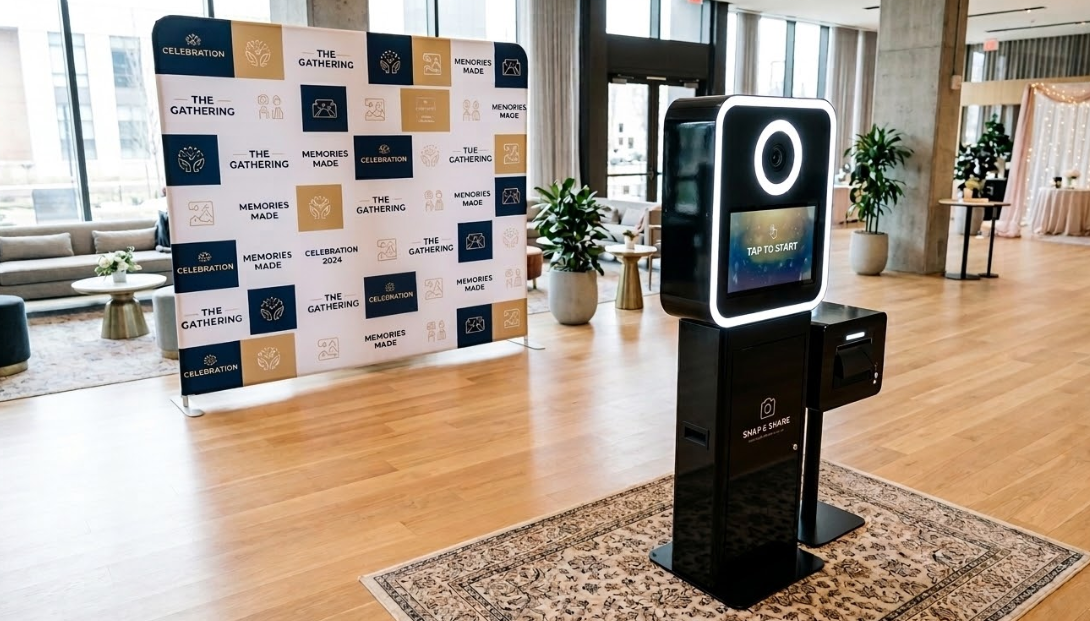
This is why ring lights became so popular for photo booth applications. A ring light surrounds the lens with a circular diffused light source that produces almost no shadow directly in front of the subject. Guests standing at the correct distance from a ring light look evenly lit from the camera's perspective, with that characteristic soft catchlight in the eye that gives photos a polished, magazine-quality feel.
Color Temperature and Consistency
Every light source emits light at a specific color temperature measured in Kelvin. Daylight runs around 5500K to 6500K and reads as neutral to slightly cool and blue. Tungsten or warm incandescent light sits around 2700K to 3200K and reads as yellow and warm. Mixing light sources with different color temperatures in the same frame creates uneven, unflattering skin tones that are difficult to correct after the fact.
For photo booth setups specifically, consistency matters more than the exact temperature chosen. A fully warm setup or a fully neutral setup both produce usable, pleasing results. A setup that combines a warm overhead chandelier with a cool LED ring light produces skin tones that satisfy nobody, including the guests who know they look off but can't articulate exactly why.
Photo Booth Lighting Tips for Different Event Environments
The right approach to lighting a photo booth changes depending on the venue, the time of day, and the overall ambient light conditions in the room. A setup that works beautifully in a bright ballroom needs significant adjustment to perform the same way in a dimly lit rooftop bar.
Indoor Ballrooms and Banquet Spaces
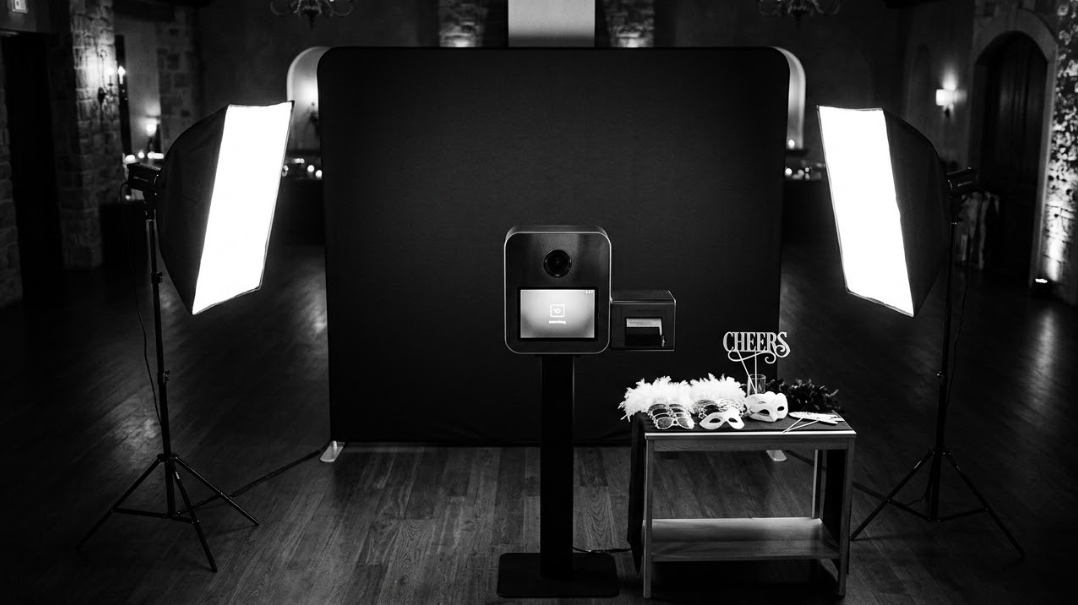
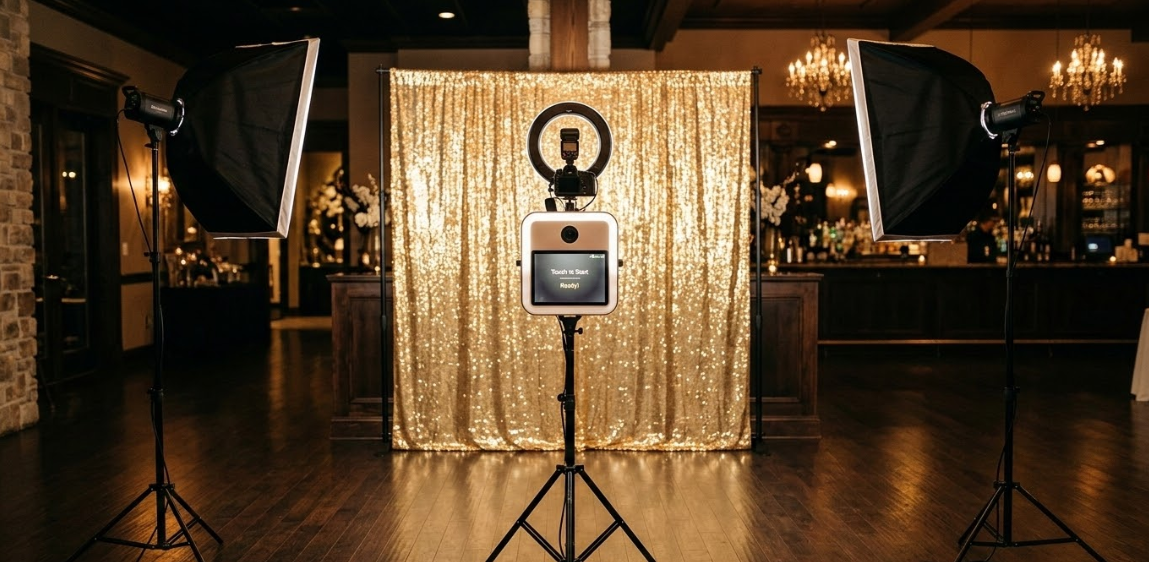
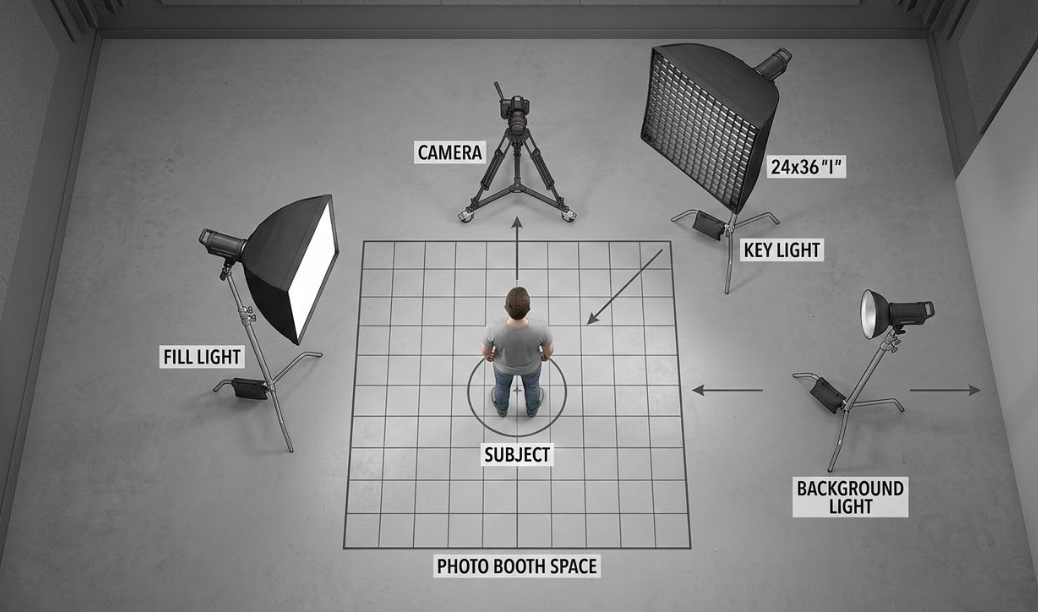
Ballrooms are the most forgiving environment for photo booth lighting because the baseline ambient light is usually consistent, controllable, and reasonably even. In these spaces, two softbox lights positioned at roughly 45-degree angles on either side of the booth at slightly above eye level create the soft, flattering three-dimensional light that makes faces look their best.
The goal in a ballroom setting is to make the booth lighting slightly brighter than the ambient room light without creating a jarring visual contrast. Guests who step into the booth should feel like the lighting improved on what the room was already providing, not like they've stepped onto a film set under harsh studio conditions.
Pairing a well-lit setup with an AI photo booth creates a particularly strong combination in ballroom environments. The AI features perform best when the input photo is cleanly lit and properly exposed, meaning better lighting at the capture stage translates directly into more impressive AI-enhanced output that guests are genuinely excited to share.
Dimly Lit Venues and Evening Events
Low-light venues present the biggest challenge for photo booth operators and event planners alike. When the ambient room light is minimal, the booth lighting has to do all the heavy lifting, and the contrast between the lit booth area and the dark surrounding room can feel abrupt and unflattering if not managed carefully.
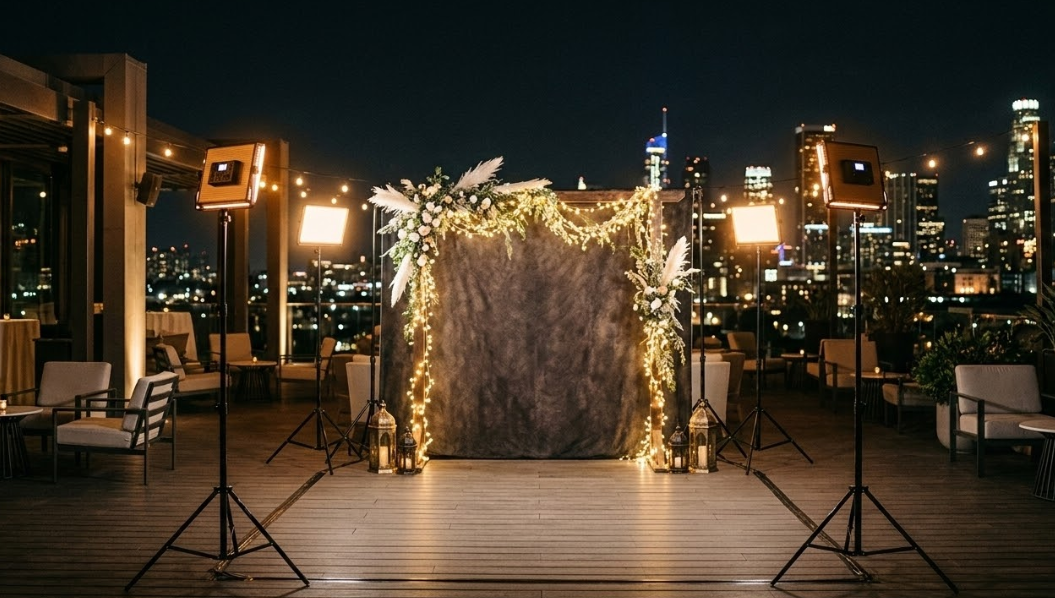
In these environments, adding a subtle backlight or hair light behind the subject creates separation between the guest and the backdrop, preventing the flat, cutout appearance that happens when both subject and background sit at similar brightness levels. A low-powered LED strip running behind the backdrop frame or a small light aimed at the background from a low angle adds depth to the overall image without overwhelming the primary lighting on the subject's face.
For evening events and activations where dramatic visual impact is part of the experience, the glambot photo booth setup uses lighting specifically designed to create cinematic quality in each slow-motion sweep. The way light catches movement in a glambot clip is directly tied to how the lighting rig around the subject is configured, which is why professional glambot setups invest heavily in lighting design rather than treating it as secondary to the camera equipment.
Outdoor Events and Daytime Settings
Outdoor photo booth setups introduce a variable that indoor spaces don't: changing natural light. A setup positioned in direct midday sun produces harsh overhead shadows that no amount of supplemental lighting fully corrects. Shade or overcast conditions, on the other hand, act as a giant natural softbox and create some of the most flattering light conditions possible.
For outdoor events where shade isn't available or weather conditions are unpredictable, a portable canopy or tent structure over the booth area diffuses direct sunlight and creates a controlled lighting environment regardless of where the sun is positioned. Within that shaded area, a battery-powered LED panel or portable ring light fills in any remaining shadows and ensures the setup performs consistently from morning through late afternoon.
Understanding how outdoor lighting interacts with branded event setups is something worth reading about alongside general venue-specific considerations. This detailed look at how photo entertainment works at The Wrigley Mansion Phoenix venues covers how outdoor and transitional event spaces handle photo activation setup in real event conditions.
Choosing the Right Equipment for Your Setup
The lighting equipment market for photo booths ranges from basic consumer-grade ring lights to professional-grade strobe and softbox systems. Matching equipment to event scale and budget requires understanding what each category actually delivers.
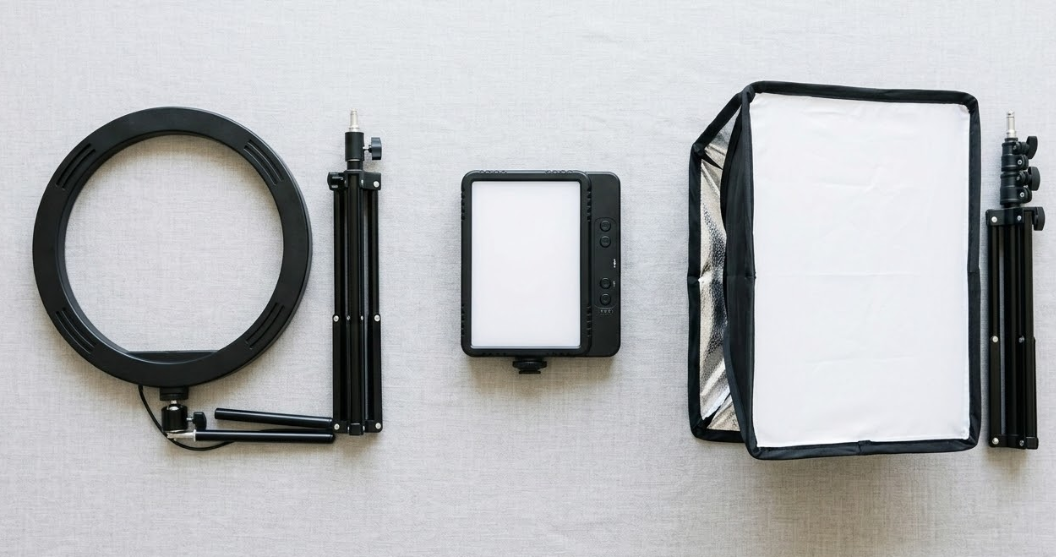
Ring lights work well for smaller setups, portrait booths, and activations where the camera is positioned close to the subject. Their circular catchlight in the eye is a recognizable, flattering feature that many guests recognize and appreciate. The limitation is that a single ring light provides even front lighting but no dimensional depth or separation between subject and background.
Two-point softbox setups cost more and take longer to configure but produce noticeably more professional results at medium to large events where guests will be viewing and sharing photos at full resolution. The pair of soft, directional sources creates gentle facial shadowing that adds dimension without the harshness of direct flash or bare bulb lighting.
For event operators running a 360 photo booth, lighting configuration needs to account for the camera's full rotational path around the subject. A standard two-point setup designed for a forward-facing camera leaves the subject poorly lit from the sides as the camera sweeps around, which is why 360 setups benefit from a wider lighting spread or a circular arrangement of lower-powered sources that maintains even exposure throughout the entire orbital capture.
|
Lighting Equipment |
Best For |
Setup Time |
Approximate Cost Range |
|
Ring light single unit |
Compact booths, close portraits |
5 to 10 minutes |
$50 to $200 |
|
Two-point softbox kit |
Medium to large events, full body shots |
20 to 30 minutes |
$150 to $600 |
|
LED panel pair |
Versatile indoor and outdoor use |
15 to 25 minutes |
$100 to $400 |
|
Professional strobe kit |
High-volume, large venue events |
30 to 45 minutes |
$400 to $1,500 |
|
Battery-powered portable kit |
Outdoor events, travel setups |
10 to 20 minutes |
$200 to $800 |
Practical Adjustments That Improve Any Setup
Even a well-planned lighting configuration needs fine-tuning once it's inside the actual venue on the actual day of the event. Light behaves differently in a room full of people than it does in an empty space during setup, and a few practical adjustments made before the doors open prevent a lot of photo quality problems throughout the event.
Checking the booth output on the actual camera at the start of setup rather than relying on how the space looks to the naked eye catches exposure and white balance issues before any guests arrive. A test photo with someone standing in the subject position at varying distances reveals whether the lighting falls off too quickly, whether background exposure is balanced with foreground exposure, and whether the color temperature reads accurately on the camera's sensor.
Reflective surfaces in the venue, mirrored walls, polished floors, windows facing the booth, all interact with the lighting setup in ways that aren't always obvious during initial configuration. A quick walk around the booth perimeter during setup identifies any unintended reflections or hot spots that could cause lens flare or uneven exposure in captured photos.
For a comprehensive look at how interactive photo entertainment comes together at real large-scale events where lighting logistics are particularly complex, this guide on how to create the ultimate fan experience for Super Bowl LIX offers practical perspective on managing high-volume photo activations. For a closer look at how AI-powered booth technology interacts with lighting quality in modern event setups, this breakdown of the best AI photo booth smart features for modern events is worth a full read.
Things To Know
-
Always set up and test your lighting before guests arrive, not after. Problems discovered mid-event are significantly harder to fix without disrupting the guest experience.
-
Bring extra bulbs, gels, and extension cords to every event. Lighting equipment fails at the least convenient moments and backups prevent a minor issue from becoming a major one.
-
Mark the optimal standing position on the floor with a small piece of tape before the event begins. Guests who stand at the correct distance from the camera and lighting source consistently produce better photos than those who guess.
-
Avoid positioning the booth directly under a ceiling spotlight or chandelier. Overhead light sources create unflattering downward shadows on faces that are extremely difficult to correct with supplemental lighting.
-
Match your lighting color temperature to the white balance setting on your booth camera. Even slight mismatches between the two create skin tone inconsistencies that guests notice even when they can't articulate what looks wrong.
-
Battery-powered backup lighting is worth carrying to every outdoor or venue event regardless of whether the venue promises reliable power access. Generator failures and tripped breakers are common enough to plan around.
-
Lower lighting positions are generally more flattering than higher ones for most face shapes. A light positioned at eye level or slightly above produces softer shadows than one mounted high on a stand shooting steeply downward.
FAQs About Photo Booth Lighting Tips
What is the best lighting for a photo booth?
A two-point softbox setup with both lights positioned at roughly 45-degree angles on either side of the subject at slightly above eye level produces the most consistently flattering results for photo booth applications. This configuration creates soft, dimensional light with gentle shadows that add depth without harshness. For smaller or more portable setups where a full softbox kit isn't practical, a high-quality ring light positioned just behind the camera lens delivers clean, even front lighting that works well across a wide range of face shapes and skin tones.
What is the 3 lighting rule?
The three-point lighting rule refers to using a key light, a fill light, and a backlight to create balanced, dimensional illumination around a subject. The key light is the primary source and the brightest of the three, positioned to one side of the subject to create gentle directional shading. The fill light sits on the opposite side at lower intensity to soften the shadows the key light creates. The backlight, placed behind the subject aimed at the back of the head or shoulders, separates the person from the background and adds visual depth to the overall image.
What makes a photo booth unforgettable?
The combination of flattering lighting, an engaging backdrop, and a smooth guest experience creates the kind of photo booth moment people genuinely remember and talk about. Lighting specifically determines whether guests look at their photos with delight or disappointment, which shapes how they feel about the entire experience. When the lighting is right, guests look better than they expected, which creates a positive surprise that makes the moment stand out from every other part of the event.
How to get good lighting for photoshoot?
Start with a soft, diffused main light source positioned slightly above eye level and to one side of the subject, then add a secondary fill source on the opposite side at roughly half the intensity to balance out harsh shadows. Ensure all your light sources share the same color temperature to avoid skin tone inconsistencies. Test your setup by capturing a photo at the actual camera position before the session begins rather than relying on how the room looks to the naked eye, since cameras and human vision respond to light quite differently.
What are the 4 C's of lighting?
The four C's of lighting are Color, Contrast, Composition, and Consistency. Color refers to the temperature and quality of the light source and how it renders skin tones and background elements on camera. Contrast describes the relationship between the brightest and darkest areas of the frame, with softer contrast generally being more flattering for portrait and event photography. Composition covers how light is physically arranged within the shooting space to complement the overall visual frame. Consistency means maintaining stable, repeatable lighting output across every photo taken during the event so guests receive a uniformly high-quality result regardless of when they step into the booth.